PREMISE
SEPTEMBER 24, 2019
Through the use of cardboard cutouts, the special carriers assignment is focused on creating cardboard packaging that will adequately illustrate my understanding of the item through its function and form. With my item being macarons, I plan to explore the various ways to portray the layers of the item before focusing on the capturing the space around it.
In this project, I strive to create a carrier for macarons through creative and effective means. Before moving towards the final results of presentation and visual experience, I hope to explore the process of trying to execute innovative ideas for packaging the macarons.
Things to consider:
- How can I best accommodate for the fragility of the macarons?
- How can I stray from the standard box that most macarons come in? Why do they come that way?
- What is the balance between creativity and practicality of a carrier?


Before addressing the assigned item, I created a few cardboard corners as a form of priming my cutting skills and understanding the material. While the assignment felt relatively straightforward, I found myself struggling with craft such as properly using the boxcutter to cut straight lines (it was different from the Xacto knife!) and taping the edges without leaving gaps. Although I had different ideas on assembling the three planes of the corner (see sketchbook page below), I found the execution of the ideas to be quite difficult, and the simple folding corner ended up being my cleanest and most successful result.
CRAFTING THE MACARONS // FOCUS: FORM
SEPTEMBER 26, 2019
At the start of the assignment, I began sketching a few different ways I could assemble the macaron. By simplifying the macaron into three main shapes, I focused on coming up with different methods to add depth to the item as well as realistically round the corners of the sandwiching layers.

In my brainstorming, I determined three potentially realistic ideas for constructing a scaled macaron out of cardboard. While some were more complex, my goal in creating the macarons was to try a different method of construction for each one.
In the first attempt at a macaron, I struggled with idea #1 in terms of the execution of gluing. Cutting strips to create the hollow dome worked better than I expected it to, but many of the smaller strips were frayed and it was difficult to glue it together at the center. While the shape of the macaron was similar, the frayed edges and poor craft detracted from the realism of it (shown below on the right).
Ideas #2 and #3 were similar to each other except for the filling on the top and bottom layers. Ultimately, #2 was far easier to construct because the folded cardboard idea in #3 made the thin paper wrap uneven and difficult to glue.


After constructing one macaron per method, I determined that my idea of cutting smaller circles and stacking them before wrapping them with a thin wrap of cardboard was the most effective (idea #2). Wrapping the paper cardboard sheet created the puffy effect of the macaron while the congregated inside circles generated the effect of texture. After deciding upon this method as the most effective, I created two more macarons to both practice my cutting skills and to test my ability in recreating a realistic macaron.


The side-by-side comparisons of the macarons I purchased from El Gayo and the cardboard macarons allowed me to see which ones were the most accurate. For a few of my cardboard macarons, the sizing was a bit small and the top layers could have been rounder.


While becoming more and more familiar with cutting and constructing cardboard, I picked up a few tricks that I found made my craft easier:
- When compressing the glue to let the layers dry, use a compass in order to adjust the compression to the appropriate pressure for each respective macaron. Using a book or heavy item will flatten the layers and reduce the puffiness of the macaron.
- In using the thin cardboard paper wrap, fold the edges diagonally instead of directly inward to create a rounded shape. Pulling the circular wrap directly inwards creates smaller wrinkles of triangles which eventually looks more geometric than organic.
- Instead of dragging the boxcutter in a fluid line like you would with an Xacto knife, punch holes along the lines of where you want to cut and connect the holes individually to form the whole shape. Cutting deeply and all at once creates fraying against the ridges of the cardboard and is dangerous because it is difficult to control.
EXPLORING SPACE AROUND THE MACARONS // FOCUS: CREATIVITY
OCTOBER 1, 2019
In creating the first iterations of the macaron carriers, I focused my paths into two different directions: practicality and innovation. While I ultimately hope to combine the two characteristics in my final iteration, I began by sketching ideas for simple boxes and drawing out the possibilities of the macaron packaging that popped up in my mind.


As most macarons are sold and packaged into geometric boxes, my very first version of the macaron carrier was in the shape of a relatively straightforward 8 x 8 cm box.

But while my original plan was to create a small macaron box that opened in the fashion of a regular donut box, after cutting out the template, I realized that there were still ways to make a regular box unique.
Inspired by the necklace/engagement ring jewelry containers, I made adjustments to the original template in order to create a box that opened from a latch that pushed into the box.
INSPIRATION FOR JEWELRY BOX DESIGN:
MY FIRST ITERATION RESULTS:


Because the top and bottom portion of the macaron are the most likely to crumble and therefore the most difficult to hold, I added depth to the box and shortened the length and width of the cube in order to position the macarons sideways for easier retrieval.
Although the addition of the latch felt minimal to the design, the act of pushing it into the whole and pulling the top open like a present drastically changed the typical consumer experience of opening a box like a book.
After completing the first box with the concept of functionality in mind, I decided to explore more unconventional ideas of form. In order to do so, my understanding of the macaron shape was challenged as I struggled to properly accommodate its form with cardboard. Inspired by a classic three-tier cupcake tray, I attempted to create an interactive design that would both be entertaining to construct and hopefully entertaining to open for the consumer.
INSPIRATION FOR CUPCAKE TIER TRAY DESIGN:
MY THREE TIERED TRAY RESULTS:


However, after creating the three tiers to the cart, I realized that it was unnecessary to have three layers and came up with a new idea to have two layers that slid into a presentation form. I decided to remove the top tier as it had no realistic function and trimmed the base cylinder to lower the height of the entire carrier:


Although I struggled with craft and measurement, the final result of the cupcake tray idea worked out better than I thought it would. Beyond the issues with craft, I was able to successfully create the cart that could be carried in a bucket form and pushed upwards into a presentation through tabs.


At the end of the process of creating two forms of cardboard carriers, I found myself with a few issues to consider for the next:
- While the two tier cart was successful in pushing up the bottom tray with tabs and a tube in order to present the macarons, stepping back, the overall function was unclear. To be straightforward, although I was excited about exploring and forming my idea, it looked at little crazy. When I asked people about their interpretation of the carrier, their questions helped give me insight on ways to improve it: Wouldn’t the macarons fall out? What is the point of having the sliding presentation form?
- Although the jewelry box was a simple idea, there were many aspects of it that were not fit for the criteria. The shape of the box did little to support the shape of the fragile macarons and was not specific towards my product. Essentially, any product that would be small enough to fit into the box could be placed into it. I need to focus on space around the macaron.
These iterations were informative in exploring and shaping cardboard with different approaches, but they also gave me direction in new changes and focuses to strive towards in order to fit the criteria of the project.
MODIFYING THE ITERATIONS // FOCUS: PRACTICALITY
FEATURING THE BRIEF INTERLUDE: IDEA CRISIS
OCTOBER 3, 2019
With a new direction towards making the products more realistic as a carrier, I decided to scrap my idea of the jewelry box and instead focus on my two tiered presentation idea. Still attached to the concept of pushing up and down the macarons, I began to look for other ways to keep the aspects of the macaron tray that I was attached to and to leave behind the parts that were unnecessary.
I started by targeting my biggest issue: how can I make it a carrier? Essentially, my greatest flaw (beyond craft?) in the two-tiered tray was the fact that it was nearly impossible to move or hold the cardboard creation without the macarons spilling out from the sides. For a project designed to make a carrier, I’d say creating a non-carrier was a pretty big issue.
While my solution was simple, the idea was effective. By measuring and adding walls to the tray, the idea of a carrier became much more identifiable with the appearance of a bucket.


The walls served a few purposes:
- Contained the macarons at the bottom
- Created the image of a bucket — carrier becomes clear
- Gives the push-up-push-down model a purpose (without the walls, there would be no reason to push the macarons upwards because you could just eat them from the bottom)
However, there were still a few clear issues:
- The macarons were still spilling out of the areas where the tabs were
- While the function became more clear with the walls, a few people were still unsure with what to do with the tabs when I asked them to look at my model (How can I make the use of the tabs clear?)
- The string did not hold the carrier well, especially because it was designed to swing the bucket. While this idea is cool, the macarons go flying…
- Although a little better, the idea still looked a little crazy. Looking at the rest of the macaron packages, most people created small and simple boxes or cylinders for their macarons while mine looked like a carousel contraption of some sort
INTERLUDE: IDEA CRISIS
As I watched other people create carriers for macarons that were far less radical than mine, I naturally grew slightly self-conscious of my idea. Following the addition of walls to my model, I started sketching out a wide variety of ideas instead of using the cupcake tier concept.


Stressed about trying to find a model that leaned more towards practicality than creativity, I began to construct a new model that explored the functionality of a packaged item.
Pulling in ideas from my scrapped jewelry box idea, I translated the overall opening latch concept to a cylindrical form that would better fit the macaron. As the issue for the jewelry box idea was that it was hard to specifically identify it as a carrier for only macarons, I shaped a holder inside that would only fit macarons.


However, the spacing of the cylinder wasn’t realistic because it only allowed for two macarons to be stored. While I could definitely add spacing in between for a third macaron, I would have to change the form of the dividers because it would take up too much space.


Things I liked about it:
- The latch from the jewelry box idea created a stronger interaction with the package than a simple open-close function
- The storage for the macarons was snug and well-fitting for the food item
- The model was clear and transportable — not a lot of room for questions
Things I didn’t like about it:
- Not enough room for more macarons
- Very similar to other macaron packaging I saw
- It felt boring. The outside wasn’t very interesting, and although I was aiming for practicality, I didn’t enjoy constructing it as much as I did my cupcake tier model and it didn’t take as much thought process either
At this point in the process, I was stuck between models that I felt were either too practical and boring or too radical. With three prototypes that looked quite different from each other, I was unsure as to whether I should continue with a focus on creativity or practicality or start with an entirely new idea.

However, after talking to the TA Asher, he told me that it’s easier to make something less cool than to make something more cool. After thinking about the different directions to take my models, I decided to stick with the cupcake tier idea.
At the end of this week’s iteration, there were a few things to keep in mind:
- Use less cardboard — how can I combine pieces of cardboards and drop the pieces that are unnecessary?
- Use less adhesives — how can I replace glue with tabs, folds, etc.?
- When someone receives the carrier without context, they should be able to put together how to use it — how can I make the cupcake tier idea more clear?
UNDERSTANDING EFFECTIVE USE OF CARDBOARD // FOCUS: CRAFT
OCTOBER 8, 2019
After thinking of a few ways to carry my idea of up-and-down movement into my next iteration, I found an idea that I felt would be most effective while still addressing the criteria mentioned above.
Essentially, the idea was that there would be a tray at the bottom of the bucket that carried all the macarons. On that tray, a handle would stick out for the user to reach into the bucket and pull the tray upwards. Once the tray was pulled to the top of the bucket, the user would rotate the tray so it would balance on the notches cut out on the walls of the carrier. This way, the macarons can be presented at the top for eating and easy accessibility and pushed down for transportation.

By creating a macaron tray with a handle that can only go upwards and to the side, this would clear up the confusion regarding how to use the carrier. I felt that this created a clear function for the macaron tray regarding protection and presentation, and it allowed for a simple yet enjoyable interaction from the consumer.
However, during this round of creating the carrier, my largest struggle was craft without adhesives. I was already struggling with adhesives and craft before this round, so creating a thoughtful carrier without any glue brought on many obstacles in the effectiveness of the cardboard.


To put it simply — my first template was an epic fail. The measurements of the circle were fine, but cutting the outside template did not form the walls that I was hoping to create. They did not match up, and evidently, did not create a uniform rim at the top of the carrier. Additionally, after cutting the pieces to fold upwards, I still had no way to connect all the frayed parts together at the top.
Although I entirely scrapped this template, I realized that having a bottom to the carrier was unnecessary when there wasn’t actually going to be anything on it. Moving back to creating the cylindrical walls I worked on in previous models, I decided to skip using cardboard for the bottom of the carrier and instead just make the walls of the bucket.


I used the arrow-latch idea from the jewelry box again in order to fit one side of the cylinder into the other, but this awkward frayed pieces of cardboard that did not look aesthetically pleasing. Additionally, the tray fit the cardboard at a strange angle, so the L-Shaped holes I cut out were measured in the wrong spots. To compensate, I had to make the cut outs much bigger so the notches of the tray would fit inside the cylinder. And while the idea still ultimately worked, it made the interaction portion of the carrier confusing again.


Although I plan to continue this concept because I like the effectiveness of maintaining the up-and-down motion through notches and handles, there are factors to consider for future iterations to reduce the issues I had with this one:
- Would a hexagon be easier to use in terms of measurements? — if so, is easier/cleaner craft worth sacrificing for the rounded shape of the macaron?
- How can I find a more effective way to attach the cardboard without it looking straggly?
- Is adding a bottom beneath the tray an effective or ineffective use of material?
And on top of these questions, things I plan to do in the next iteration:
- Make four notches and L-shaped cutouts instead of two. While this makes the measurements harder, one major flaw in the carrier was that putting pressure on one side of the tray at the top of the carrier would tilt it and send all the macarons spilling. Adding four notches would maximize stabilization while still maintaining clear function of the carrier.
- Do math. Although I’ve done my best to avoid it (my whole life), mathematically calculating the measurements would make the assembling much, much easier. Instead of eyeballing it, having precise measurements can help me avoid wasting more time.
- Make the L-shaped cutouts after making the tray. Because even if I do the math, with my cutting skills, chances are high that the location of the notches still won’t match up to the L-shaped cutouts. Create the tray, then mark the location of the notches, then cut out the L-shape for sliding.
FINDING BALANCE BETWEEN IDEAS AND REALITY (War on Craft) // FOCUS: OVERCOMING STRUGGLE
OCTOBER 10, 2019
After the speed dating critique, I received a few more notable tips that pushed me in different directions than before. While a few of the comments varied, there were a few comments that stood out to me that I wanted to try to improve in my next iteration:
- It’s confusing as to where the macarons are supposed to go (how can I make the carrier specific to the macaron?)
- Try using three notches instead of my plan to use four (is my use of cardboard effective?)
- It’s possible to create a cylinder without scoring as much, instead I can fold the cardboard at the ridges (how does the technique conform to the concept of the carrier?)
- The handle for the tray makes the carrier confusing — how is it supposed to held? (
- Holding the macarons are unclear; the macarons could spill off without a lid (how can I make the interaction easier for the user?)
With this in mind, I added a few revisions to my macaron carrier. Carrying my concept of using pockets for the macarons in one of my previous models, I added a bottom layer to the tray of macarons and cut out round shapes to fit the macarons to tackle the problems of 1.) an unstable bottom, 2.) stability for the macarons, and 3.) making the carrier more specific to my product.


At this point in my new carrier, I was feeling pretty optimistic.
My craft was better than previous iterations (although still not great), and everything was fitting surprisingly well. My idea was that I would fit it inside the cylinder, the user would pull from the center piece in order to avoid confusion with a bulky handle, and latch at the top with my precisely measured L-shaped cutouts.
Next, I began to make the cylinder using the non-scoring technique. I pressed the layers of congregated cardboard against the edge of a table to create a curved shape.
And that’s when things started to go wrong.
Assembling all the pieces together escalated into a series of quick realizations that 1.) they didn’t fit together and 2.) the physics didn’t work out the way I planned. In order for the notches to stay in place, the inside tray needed to be tight against the outer walls. However, with the outer walls being too tight, the friction of the sliding tray was too strong and it didn’t pull up conveniently.
Trying to figure out new ways to connect and adjust with new cutouts, I then went on a multi-hour endeavor of trying different shapes, measurements, and designs in order to make the model work.
Each time I created a new iteration in my mind, I found a flaw when I tried to translate that idea into a reality and tried to fix that flaw… only to find another flaw. So I repeated this cycle again and again, and failed again and again.

…and failed again.

…and again.


And so at this point in my carrier, I was no longer feeling optimistic.
I was consistently messing up my measurements and craft and found myself battling cardboard in ways that did not conform to the criteria of the project.
Drastically discouraged from multiple failed attempts, I felt like there was nowhere to move without falling back into the cycle. So instead of pushing forward with new ideas again, I decided to move backwards.


While the craft was worse than some of my other failed models this round, I created one last model that focused on the most fundamental aspects of my carrier that I wanted to keep or modify in order to (hopefully) successfully build upon in the future. (In other words, what worked vs. what didn’t)
- The double layered tray to hold the macarons
- The up-down movement for protection and accessibility (with the L-shaped cutouts and notches)
- Using tabs to connect the cylinder (but they need to be steeper to be secure!)
While this round of iterations was mostly unsuccessful and disheartening, simplifying my model allowed me to organize my thoughts in terms of what I like about my carrier and narrow down what I need to fix the most:
- Finding a way to pull up the bottom
- Creating a handle for the carrier
- Making a lid for the top of the carrier
PICKING UP AND LEAVING BEHIND PIECES // FOCUS: IDEA CONJUNCTION
OCTOBER 14, 2019
For my final iteration, I pulled together the different strategies for each of the previous iterations in order to construct a product that would function properly.


Each of the ideas had pros and cons, and I ultimately went through three more attempts at a successful model before finally constructing my final carrier.
ATTEMPT 1


As one of my main issues from my previous iteration was the lack of a lid and proper way to carry the carrier, I decided to follow a concept of a multi-purpose lid that functions both as a top and as a handle to turn the tray upwards. While the three tiers of the lid worked well, it still didn’t work with the cylindrical wrap for a few reasons:
- The friction was too strong for it to turn
- The handles were not strong enough to turn the weight of the two trays
- The walls of the cylinder were immensely flimsy and unstable
ATTEMPT 2


Changing the outside wrap into the shape of a hexagon allowed for gaps between the macaron tray and walls, reducing the friction and allow for a twisting movement without restraint. Although I used adhesives just to test out the concept, overall, the idea led me down a more solid path towards my final.
ATTEMPT 3


Things that worked:
- thicker handle at top
- octagon outside to minimize friction while the inner circle is turning
- single layer for macaron tray instead of two layers to minimize weight
Things that failed:
- The pillars to the lid were not in place, so pushing the lid back down didn’t work because the tray and lid slid towards each other with pressure
- Measurements for the L-shaped cut outs were off so the sliding was not smooth (but was almost there!)
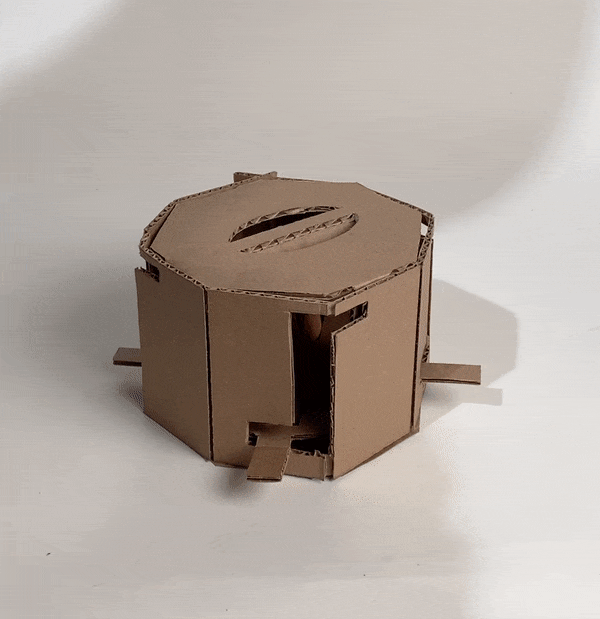
FINAL MACARON CARRIER


The final macaron carrier differed from Attempt 3 in a few ways that made it both successful in movement and also more stable:
- Wider handle for holding comfort
- Single tray of macaron to lessen the weight to pull up
- Three notches instead of four for accurate measurements and sturdy latch
- Rectangle holders for the macarons to prevent them from slipping through an organic shape
- Octagon-shaped lid for a sense of security and a defined top and bottom
UNDERSTANDING CARDBOARD // THE LEARNING PROCESS
In reflecting upon the premise, there were a few goals that I was able to meet and a few core aspects of the project I feel that I could have focused on better.
GOALS I MET:
- By exploring the different forms at the start of the project, I was able to push myself into creative mindsets in order to defy the standard macaron packaging of a box.
- I gained the chance to talk and brainstorm with other classmates, as well as the TA’s Asher and Zoe. Interacting with others and exposing myself to different perspectives allowed me to consider a wide variety of ideas with less of a focus on failure/success and more consideration to exploration. Asking questions such as “What do you see?” or “Which package would you be more inclined to open?”
- Each new model I made was different from the previous in some aspect, giving me a relatively thoughtful insight on improvement from my very first attempt at creating a model.
PROCESS FLAWS / THINGS TO LEARN FROM:
- My cardboard carrier didn’t respect the cardboard. While the final result was mostly successful, it was a prototype that would beneficial for metal gears instead of cardboard packaging. In multiple areas of the package, I was asking too much of the cardboard in terms of holding, pulling, etc. I had too many small tabs and separate pieces pulling more weight than they should, so my goal to simplify in an effective means was not met. I focused too much on creativity and experience and failed to acknowledge the balance with simplicity and practicality.
- Craft, craft, craft. One of my greatest obstacles was my lack of understanding of corrugation and my difficulty in cutting to proper measurements. I learned that “eyeballing it” will only bring you down a path of prolonged failure, and although it can be painful, there is no such thing as being too careful in fitting pieces. Many of the structures (especially the octagon connector) could have fit better or worked more efficiently if my skills in craft did not impeded on my execution of my ideas. However, at the end of the project I believe my skills definitely improved and I hope to utilize my new skills for upcoming projects.
- I thought I was iterating, but I was really just attaching myself to an idea. As shown in the process of my medium, I was a bit too idealistic about my iterations. The action of identifying flaws in my models made me feel optimistic about my next one, so I dug myself into an endless cycle of failing and trying again instead of questioning if the number of times I failed meant that the idea in itself was not one to continue pursuing. My optimism and stubborn attitude in doing “just one more to finally get it right” pushed myself into a position at the end where I should have simplified and explored earlier on but only trained my eyes on the end result I was really looking for.
Even if my final result had room for improvement and I found myself focusing on misdirected aspects of the project, trying and failing allowed me to understand why it is important in the first place.
Although I may have struggled for many of my iterations and failed to reach all of the goals that I planned for in my premise, I gained loads of invaluable information on the experimentation process. I feel that the entire experience of sketching, composing, readjusting, and trying again helped me build a stronger mindset and skillset than if I were to get it right on the first try. While it evidently sucks to suck, I think I learn the best by struggling and challenging myself first and then growing from there.
