Design Lab | Spring 2020
PREMISE
In the natural world, physical forms are constructed and shaped by nature with a sense of purpose or reason for being. Similarly, as humans build 3D objects to serve a desired function, the physical qualities of its form are crafted and measured in order to best fit that purpose.
The project aims to understand how the physical elements of an object build a deeper meaning to its shape and form. By studying the structure, balance, and dynamic of a natural and human-made object using different material mediums, I aim to create a hybrid form that translates the distinctive features of the two into a representation of an overarching understanding of form.
OBSERVING // UNDERSTANDING FORM
For my first 3D task, I selected a natural object to study and analyze in order to translate its features into my own model. Using two different types of medium for my natural object, I explored how using specific materials allows me to understand certain features of my natural object as I construct its form. Although I originally had a starfish for my natural object of study, as a result of the fast-paced transition to remote classes and studio, I ended up using a massive conch from my home.


Although the shell was much more complex, there were many physical qualities that gave me room to analyze. I first spent time physically holding the shell and turning it over in order to understand the complexity of the structure, but the multiple layers and spirals became overwhelming and I found it was easy to get lost when maneuvering such a large object.
In order to understand each of the parts of the shell in relation to each other, I sketched out the shell in many different positions to gain a better grasp of its spatial composition.


Drawing out the conch helped me gain a much deeper understanding of not only the details of the complex shell, but also the overall layout. Drawing with construction lines helped me recognize the main structural movement along the shell, and refining it helped me with the curves that are unique for this shell specifically.
I learned that the conch shell is one long roll with the edge unfurled. Although thinking about the shell in this manner was largely abstracted, understanding the shell as a single large, connected entity as opposed to a two piece object of body and wing gave me a clear starting point when I began constructing my model out of clay.


My first chosen medium for my natural object was clay because it allows me to accurately capture the many curves of my shell, as well as the spikes, spirals, and ridges. Using my space heater to heat up the plastilina clay, I started my process of representing my natural object by loosening up the clay and rolling out in order to make it more malleable for the details.
After rolling out a sheet of clay, I rolled one corner into itself to create the body of the shell, leaving out the rest of the sheet to mold into the open end of the conch. Once I had the main shapes of the shell in form, I started sculpting the clay to fit the individual elements of my natural object.


Although rolling one sheet of clay into itself helped aid the fluent body-wing connection of the shell, I had to fill the inside of the main shell body with pieces of clay in order to prevent it from collapsing. The softened nature of the clay made me realize that especially with an irregular shaped object like mine, I would need to add more content to the body in order to effectively balance out the dynamic between the cone and the wing of the conch.


After setting the overall form, I began translating the specific elements of the shell that make it unique. In making the spirals and spikes, understanding the balance between each layer of the spiral was crucial to making the model accurate to my natural object. The act of physically molding the clay in my hands and working with the soft material allowed me to identify the points of strength and support within the conch’s irregular shape. For example, I learned that the wing/open part of the shell is much more delicate and flexible, contrasting the bulk of the body and the heavier clay closer to the centerpiece or middle axis of my natural object.
ITERATION 01 | NATURAL OBJECT [CLAY]


LOOKING BACKWARDS
- Finding an accurate shape for the form is much easier when I am constantly switching back and forth between feeling the natural object and modeling the clay translation
- Clay is much more difficult to smooth down than anticipated — especially with thinner areas; without appropriate clay tools, smoothing down the model is a process that feels nearly unending
- The areas of the shell that need more clay/material are often the strongest parts of the natural object because they are the densest
- Finding balance along all axes (XYZ) of the shell is crucial to having a malleable material maintain integrity or else it will fall apart or slump into inaccurate forms; indicative of balance within the natural form
MOVING FORWARD
- Craft — there are many bumps covering the natural object that detract from a general abstraction of the form
- Form — the shape of the clay model is a bit more narrow than the actual natural shell, which is shorter and creates a wider semi-circle motion that gives it stronger balance and greater dynamic
- Scale — while I still scaled the shell down in comparison to the actual natural object, it would likely be more efficient to work at a smaller size
In the future, I plan to implement the practice of translating individual elements of the conch shell into a simpler form into other mediums and 3D objects.
CRITIQUE [03.24.20]
- Spikes in the clay model feel too exaggerated; ends of the spikes feel a bit “gum-droppy” (not a smooth transition)
- In the future, work smaller and pay more attention to form and less attention to detail
ITERATING // REFINING CLAY SHELL
For my shell corrections, I had a few main goals:
- widening the shell to make it more accurate towards the form
- extending the wing in order to create a larger effect
- make the spirals and spikes at the top less stubby and exaggerated
By adding clay to make the top of the shell thicker, I was able to give my clay conch shell much more depth and curvature. However, I still had a difficult time smoothing out the clay and creating an aerodynamic flair with such a thin layer of material for the wing of the conch shell.
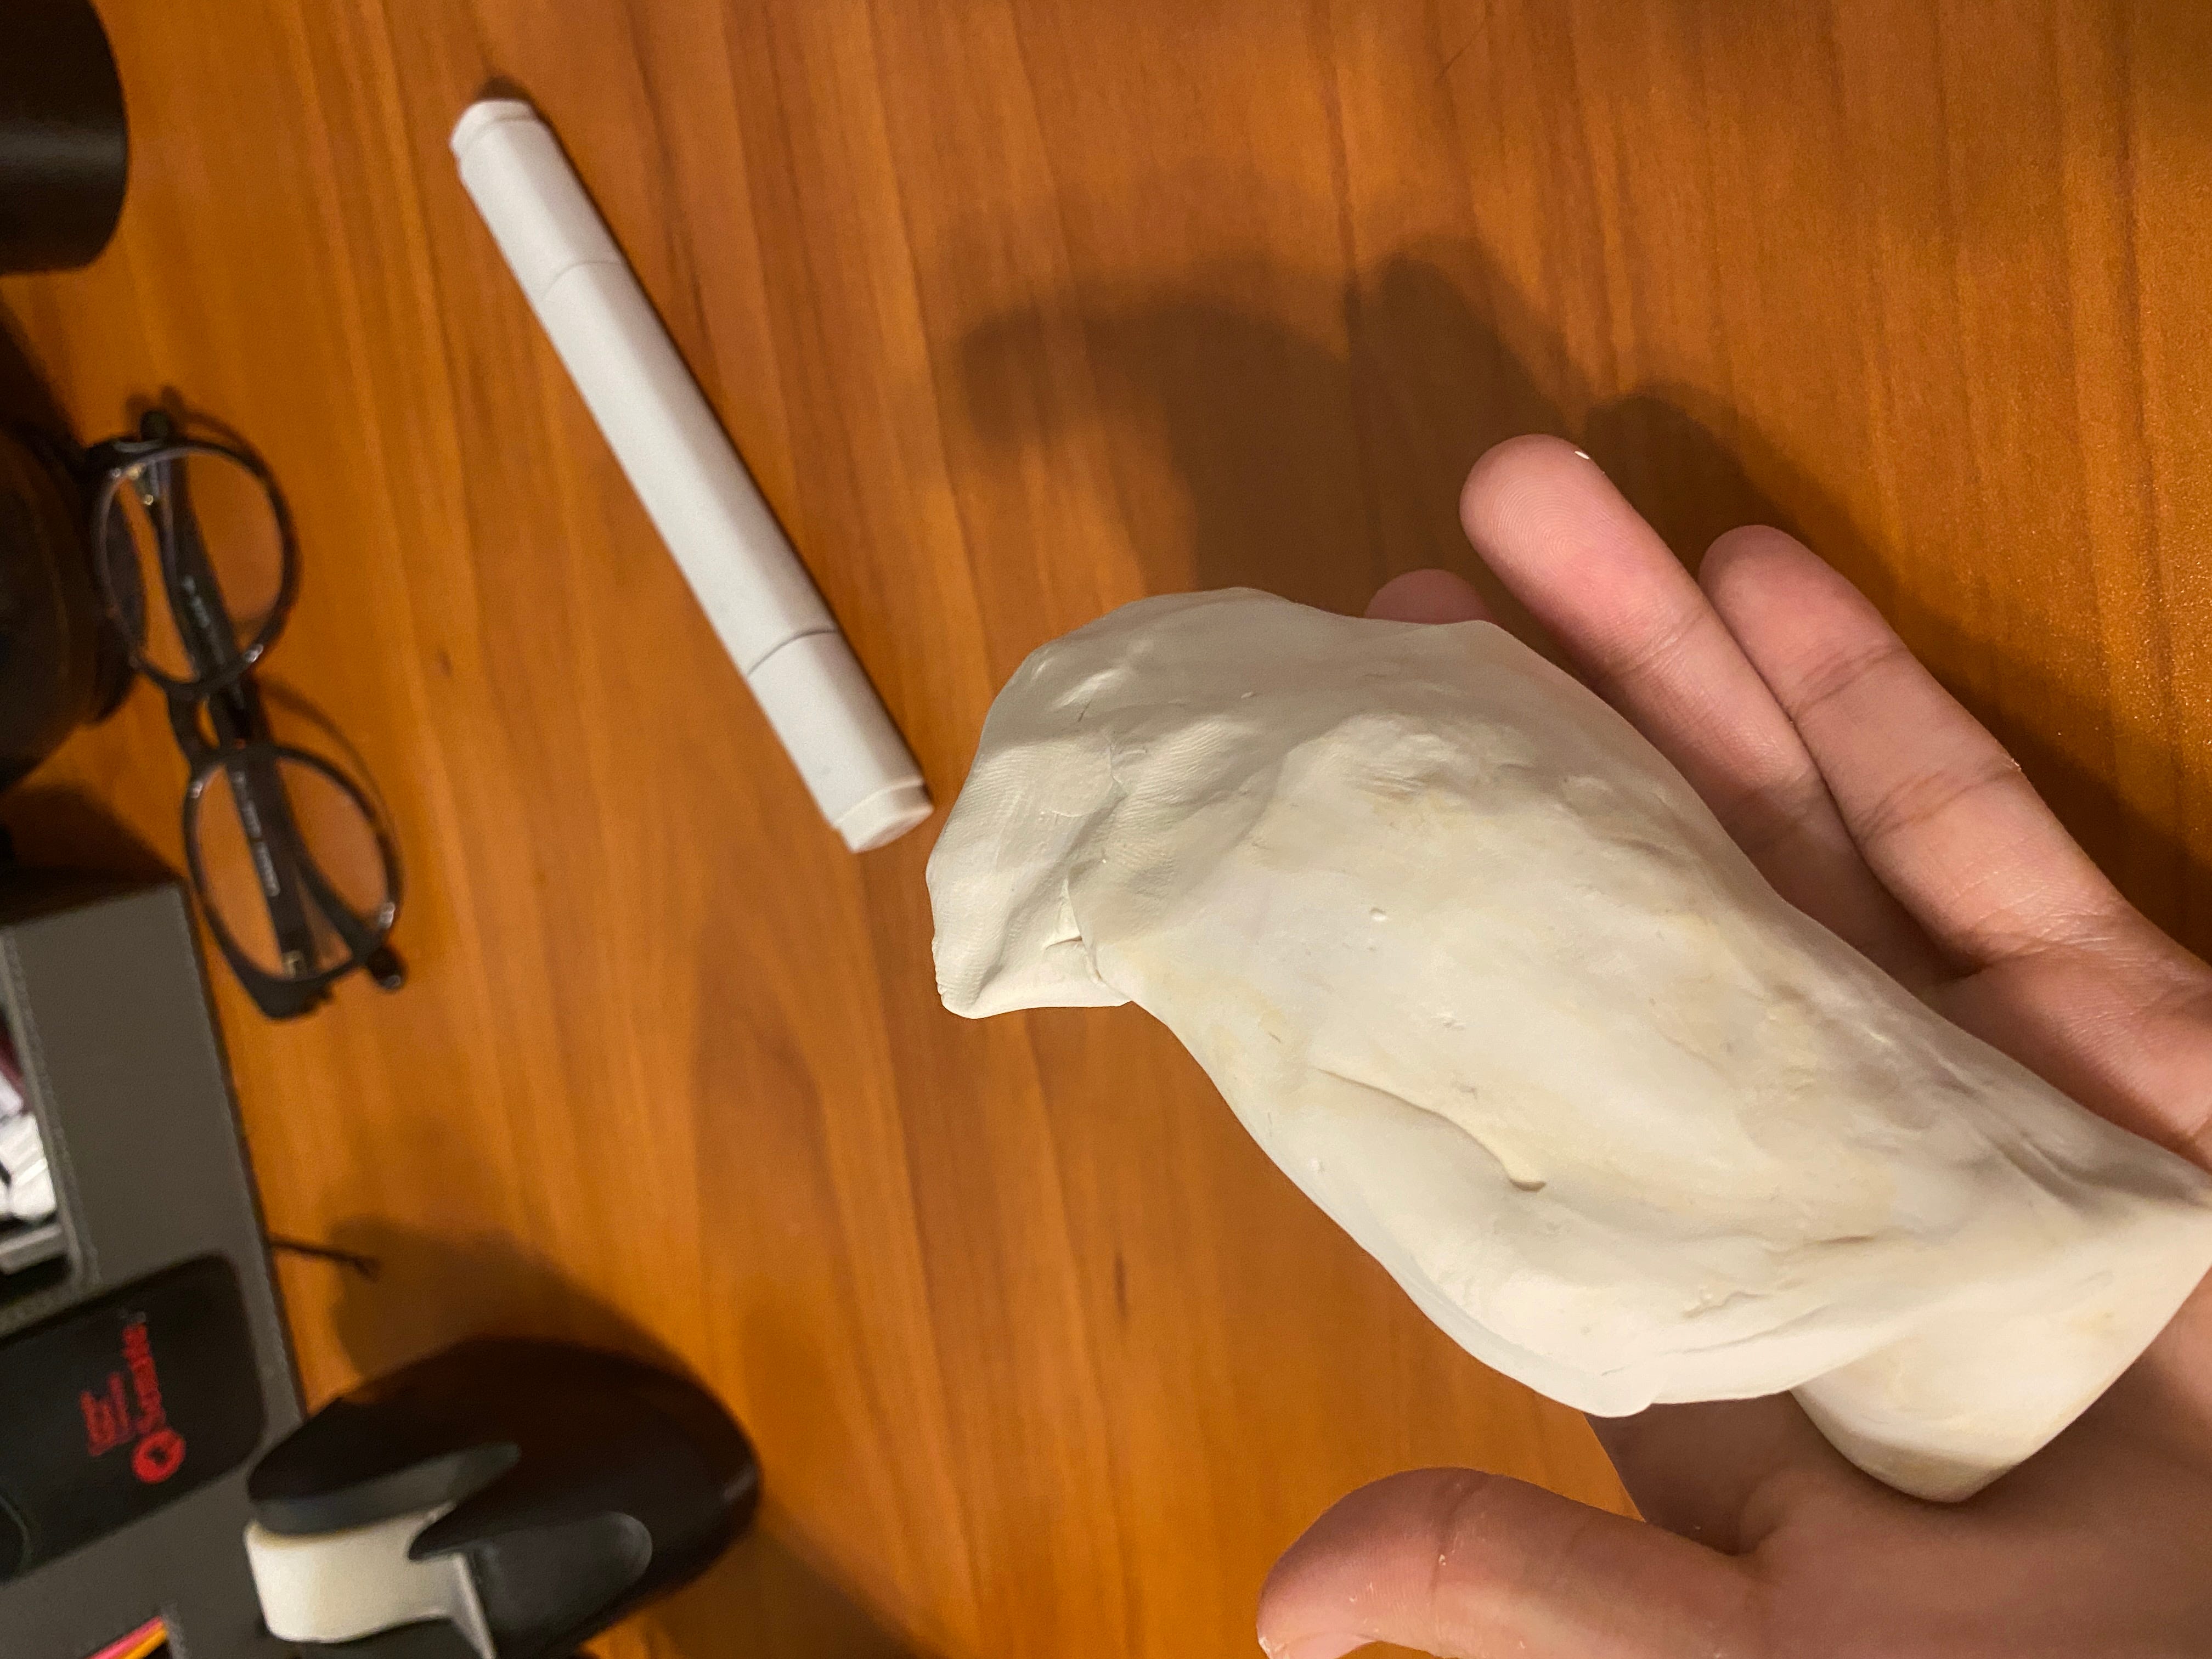
FINAL CLAY SHELL FORM


ABSTRACTING // STUDYING NATURAL FORM
After working with clay in order to study the conch shell, my study of my natural object then shifted into a more abstracted form as I used a subtractive medium. As carving with the foam was much more difficult to capture the complex shape of the shell, this study of my natural form was much more focused on understanding the overall shape and structure of the shell instead of being focused on the small details and ridges.


To start, I first cut out a large square of foam in order to set the general size and boundaries of my foam shell. However, I had to scale down the overall size of the shell significantly due to the thin nature of the foam that was given. In order to keep the height, depth, and width proportional with the given constraints of the material size, I had to abstract the overall shell in order to both accommodate for the depth constraints and the difficulties with carving details into the foam.


Carving foam into a rounded shape was much more difficult than I expected it to be. The nature of the foam made smooth cuts often times flakey or rigid, so accurately matching the smooth curves of the shell was difficult with only a blade. Additionally, working from a cube meant carving the rounded form towards the center of the block to create an even radial form in the shell body. Although I had the overall sketch of the two main portions of the shell blocked off, working with depth and curves was one of the greatest challenges to carving towards the natural form.


Towards the end of my foam iteration, I started focusing on features that were more specific towards my shell. After working on balancing the weight of the foam in order to make it more of a curved shell and less of a block, I began carving at the ridges and curves of the top spiral portion. However, due to the nature of the foam and the small scale of the shell, the top part of the natural object remained much more abstract without the pointed spikes.


As shown in the comparison, although I was able to abstract the main portions of the conch, the wing of the foam model was not as accurate to the form of the actual shell. The top of the wing extends past the main body of the shell, and it also has a curved form that flips outwards at the top. In my foam model, the wing has a rigid structure, and the flare at the top is much more subdued compared to the actual shell. The foam material was fit for understanding the general structure and main components of the natural object’s form, but it was much more difficult for capturing curves and details.


Placing all three together allowed me get a better understanding of how the medium and scale can affect a models accuracy in terms of detail and form. Each of my iterations scaled the shell down significantly with consideration towards the medium being used.
For the clay model, I was able to focus on details and organic form of my natural object. The additive nature of the clay helped me add features to build upon the main shapes, while the subtractive material of foam was a process of working at large and sculpting it down to move closer to the accurate form. However, the light weight of the foam helped me learn more about the balance of the shell because adding the proper proportions to the model was crucial to keeping it upright. Focusing on the denser points of the natural object helped me understand the weight dispersed throughout the form by studying how the wing balances out the body of the conch.
CRITIQUE [03.28.20]
- Because my chosen object is so large, it would be helpful to study the form of the shell from far away in order to understand the overall structure without getting caught up with details
- For the clay model, in order to make more abstracted yet representative movement along the wing, focus on the general planes of the curve instead of having a flat wing with smaller curves and bumps
- The clay model could also show the curved ridges that run across the body of the shell to convey movement; this will show a more distinctive feature of my natural object instead of simply having a smooth shape
- For the foam model, it would be informative to keep the spiral of the conch but abstracting the specific spikes and bumps would help emphasize the form better
- The most significant difference among all three shells is the flare of the wing, so building upon that will be really crucial to capturing an form that is unique to my natural object


SELF REFLECTION VIDEO
ITERATING // REFINING FOAM SHELL
For the next iteration of my foam shell, I wanted to make sure I would be able to place greater emphasis on the wing and less emphasis on the bumps and details the top spiral of the shell.


Similar to my first foam iteration, I drew out the general outline to sculpt around for my shell. However, in order to avoid too much subtracting and making my shell wing too narrow like last time, I gave a bit of extra room by emphasizing the width of the form in order to give more areas to sculpt down if needed.


Compared to the first foam iteration, the second foam iteration had a much more accurate wing that extended outwards. Although certain areas were vague without the details of the spikes and bumps, there was a much stronger presence of a “flair” in the wing in relation to the body of the shell.
FINAL FOAM SHELL FORM


TRANSLATING // OBSERVING HUMAN-MADE FORMS
[03.31.20]
When approaching the human-made form of the computer mouse, I paid attention to its overall form instead of the textures and tiny ridges. I noticed that while the generic shape seems like a simple organic object with very little complexity, there are subtle curves that identify a purpose and unique qualities in its form. In order to better understand the formal qualities of depth, curvature, and length, I sketched out my human-made object in multiple positions to capture all of its angles.


In understanding the curves that make up the organic structure of my object, I also began to realize why certain physical properties are specifically designed by and for humans. The overarching curve of the mouse allows for the average human hand to rest at a comfortable angle, creating importance to the degree of depth that the object has at the peak of the curve. Additionally, the side curves create an ergonomic structure for the fingers that allow for a more secure grip to rest upon when using the mouse.


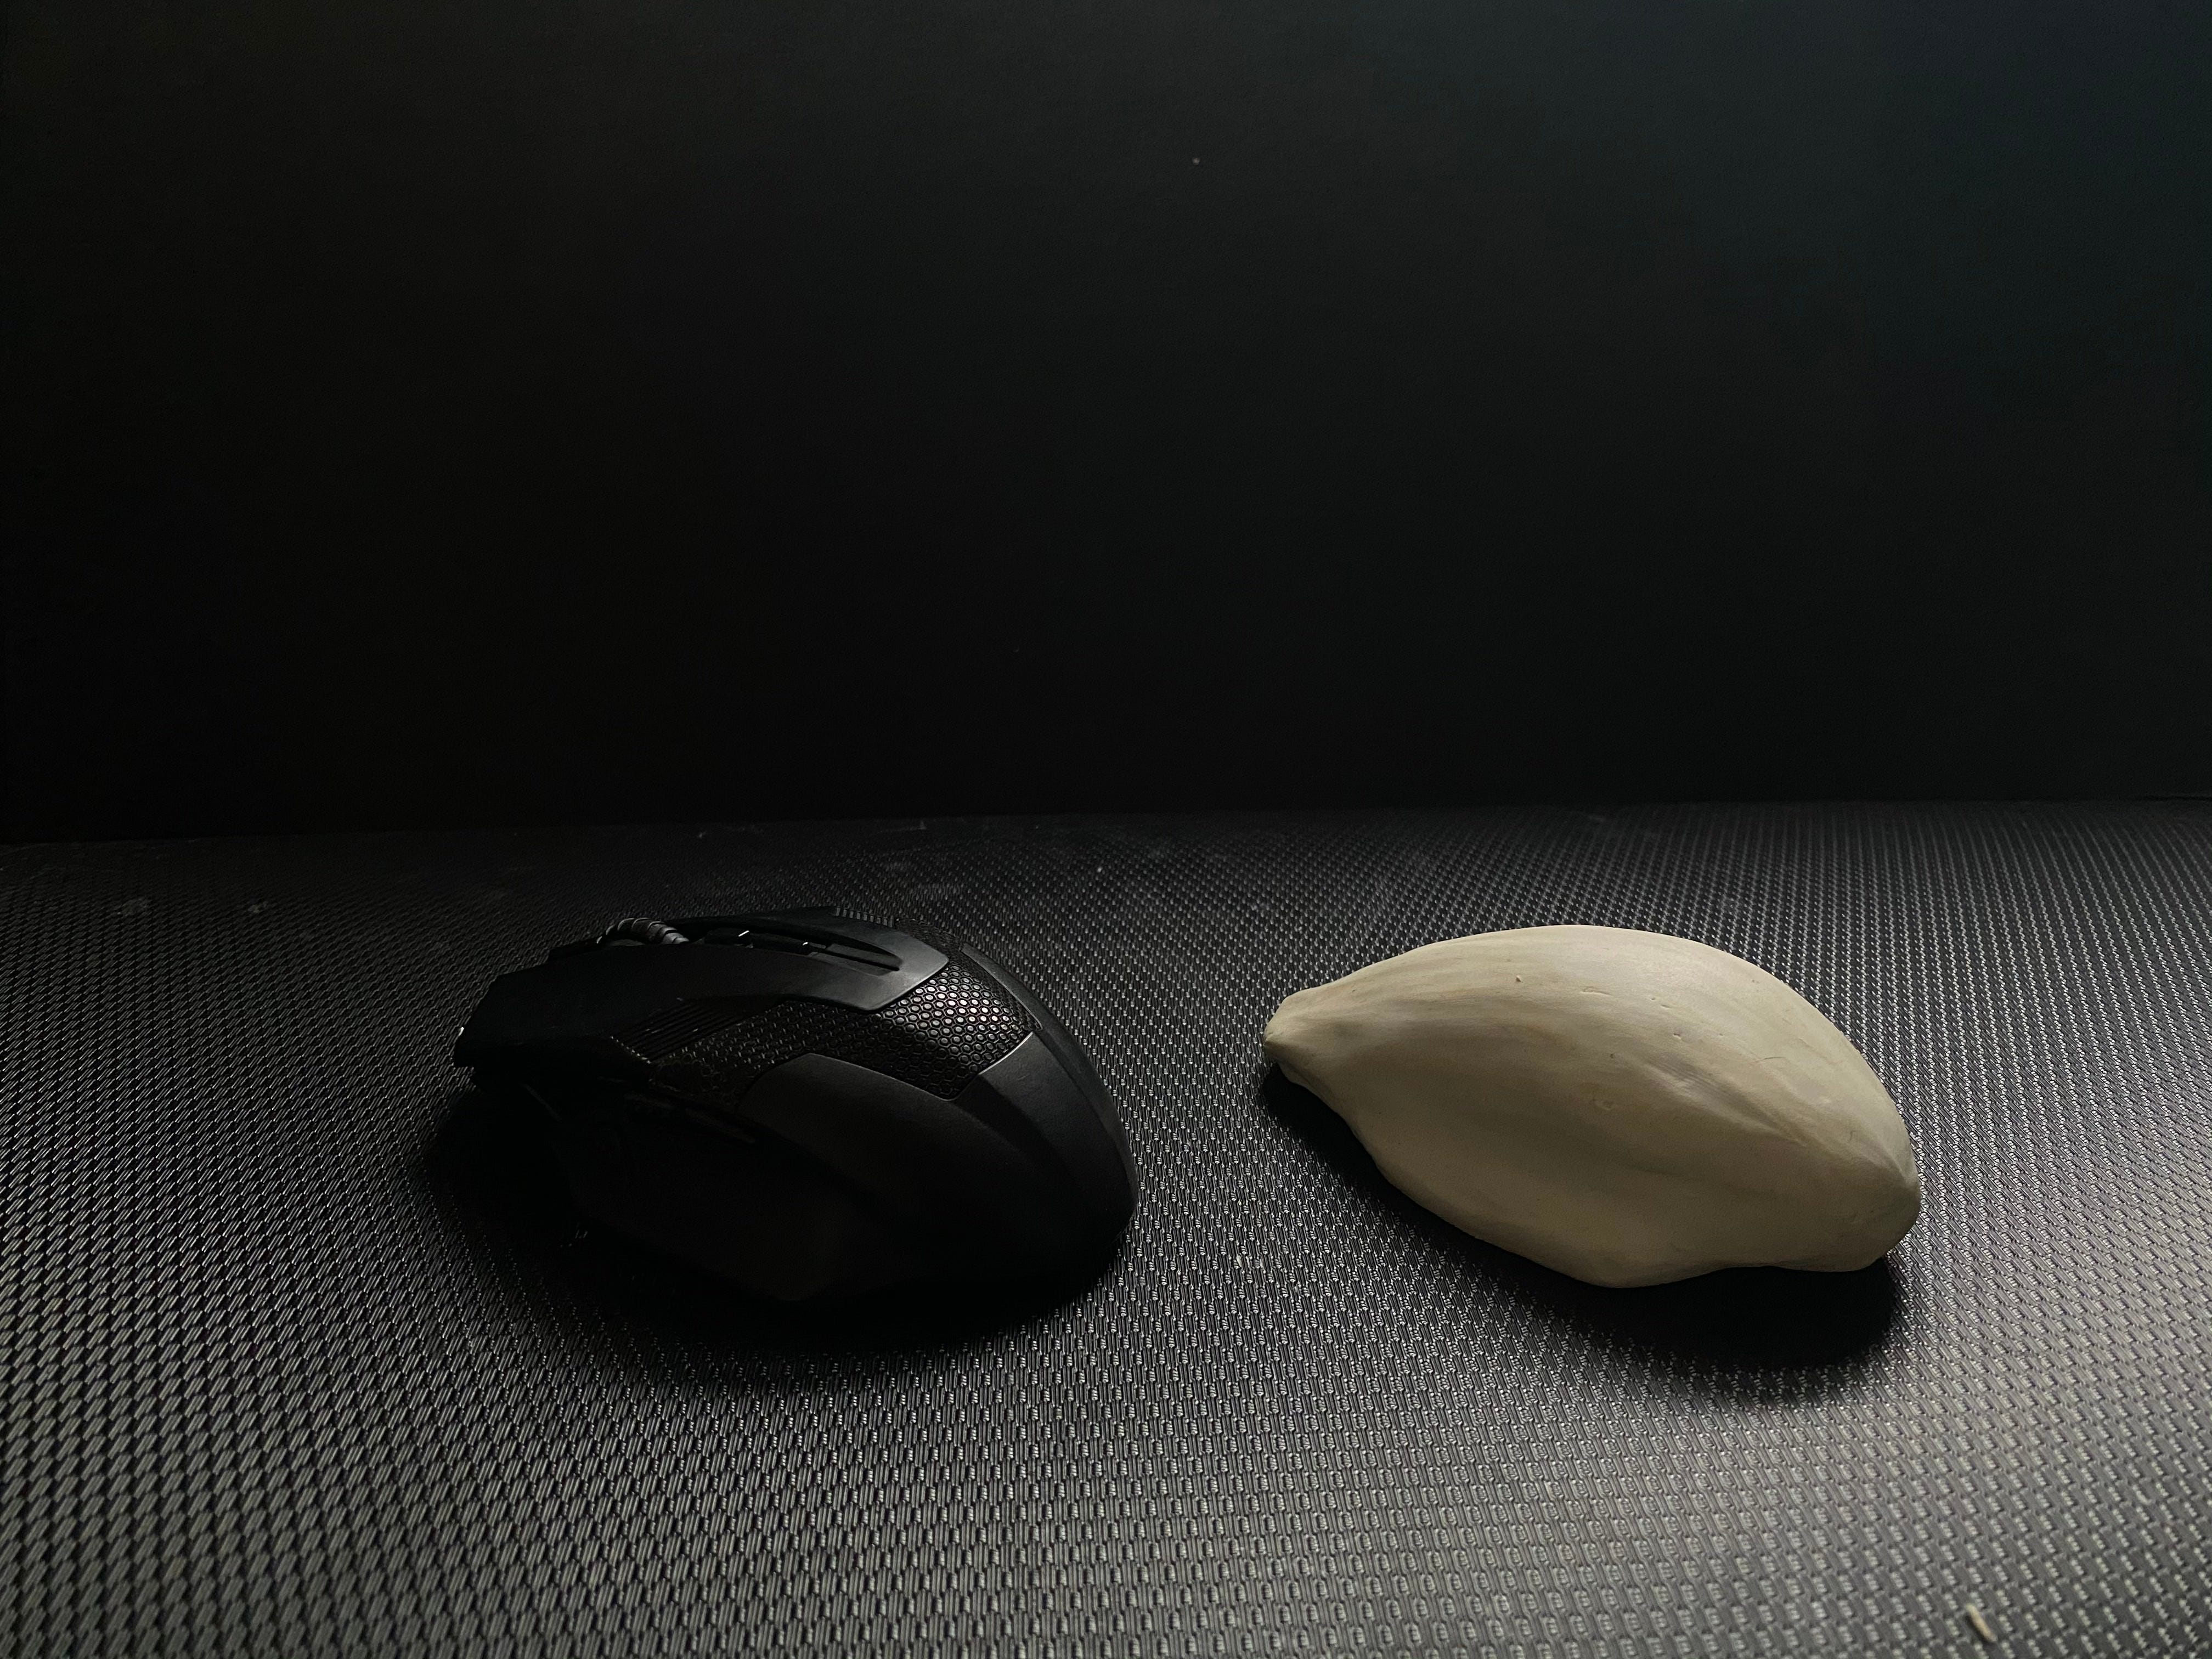
Unlike my natural form, I started translating my human-made object by creating a mass shape of clay in the most primitive form that can replicate the mouse. From this form, similar to the foam model, I moved towards a more informative representation by smoothing the bulkier areas out into intentional curves.


Although my human-made object has symmetry and a much less complex form than my natural object, smoothing out the mass of clay into communicative qualities helped me also understand weight distribution. By studying the ball of the mouse, or the bulk of the weight, I was also able to see how the sturdiest or denser points on my objects were the areas that were designed to withstand the most pressure from the user.


Once I was able to translate the abstract form of my computer mouse, I then started shaping the features that were unique to my object compared to others. However, although I made sure to pay attention to certain ridges and curves, I still made sure not to get too caught up in the details with certain pieces like the scrolling part of the mouse. Instead, I tried looking at my object’s distinctive shape in a simplified manner.


LOOKING BACKWARDS
- With less complex shapes such as the mouse compared to the conch, it is easier to identify bumps and irregularities in the clay
- The top of the mouse needs to be more elevated instead of flattened out towards the ground
- Shifting between holding the actual computer mouse and the clay model helped a lot with physically feeling the ergonomic aspects that make the human-made form more intentional
MOVING FORWARD
- Evenly distribute the bulk of the clay along the curvature more
- It might be more effective to use tools such as a card to smooth out the clay texture instead of my hands in order to avoid finger marks
- Consider making the clay model less abstract/organic and explore the hard edges throughout the computer mouse reference
ITERATING // REFINING CLAY MOUSE
Because my first clay mouse was too abstracted, the next few iterations of my clay mouse were heavily focused on adding the distinctive qualities of my geometric computer mouse.


Much of my process for the clay mouse was moving back and forth between the actual mouse and the clay form, adding smaller details and measuring angles in order to make sure in conveyed the unique characteristics of my mouse.
FINAL CLAY MOUSE FORM


ASSEMBLING // CRAFTING MY PAPER MOUSE
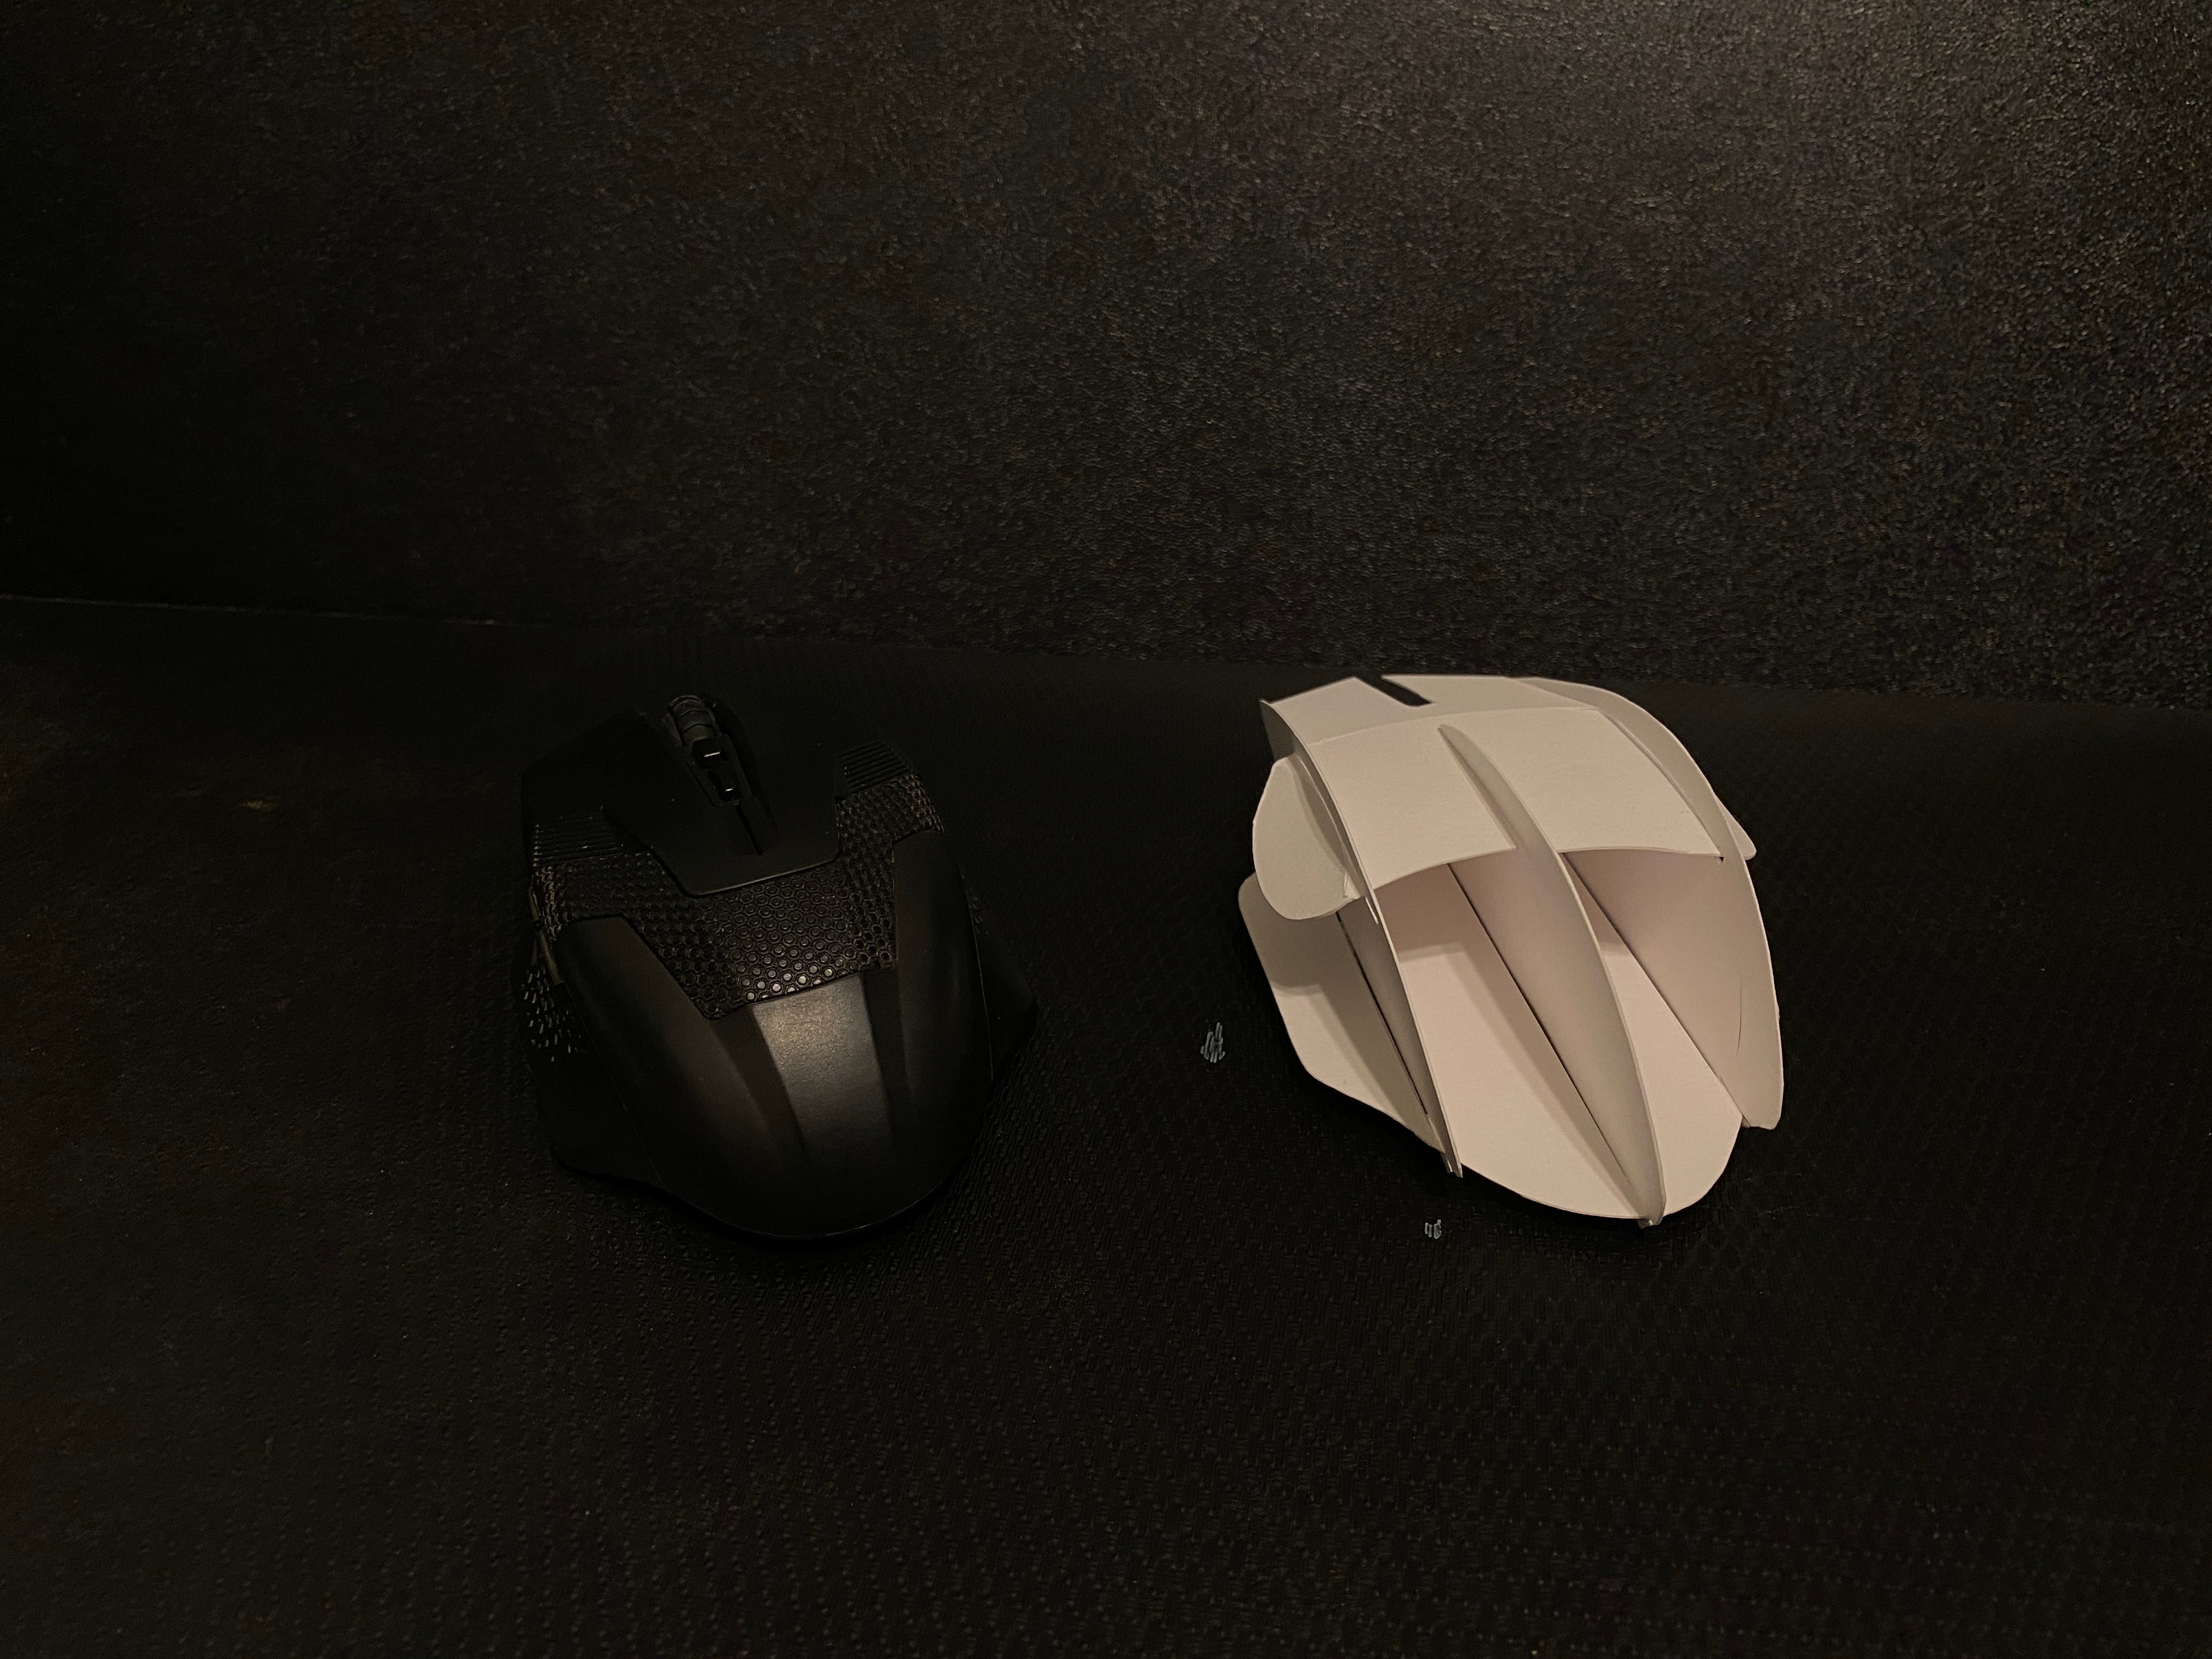
For the next iteration of my human-made object of a mouse, I chose paper as my medium. Although I did not have access to bristol, I had mixed media paper that had a very similar thickness and texture.

My approach to constructing the mouse of paper was to start from the foundation of the structure and build upwards into its most basic form. Once I cut out of the core shapes with proper measurements of the base and curves, there were many different options and techniques to choose when it came to attaching the pieces.


For my method of attachment, I decided to connect the pieces by cutting slits and notches into each of the pieces so that they would slide into each other and lock due to the angle and friction of the mixed media paper.


In order to keep my computer mouse abstracted yet communicative, I translated the curve of the mouse through three main cuts of paper. The side pieces of paper had less of a steep cut in order to illustrate the ergonomic aspect of the computer mouse that accommodates for thumbs and fingers. However, as shown in the middle image above, it was clear that I needed to add some type of support that would hold the three curves together and represent the top surface of the object.


In order to avoid cutting out the measured pieces of my mouse if I messed up, I cut out a few rough general shapes in order to experiment with curves and connection among the three shapes. By testing out how to represent the surface of the mouse using scrap pieces of paper, I was able to determine that lightly scoring the top of the surface would allow for the geometric yet subtle curve shown on the object.


However, although I was able to determine the curve of the individual paper, I had a hard time connecting the top piece to the side curves due to the thin cuts and nature of the paper. I realized I would need more paper weight on the sides of the mouse in order to balance out the dip at the front of the object, so I recut the top piece of my mouse.


ITERATING // REFINING PAPER MOUSE
Although my first iteration of my paper mouse was able to capture the planes of the mouse, my next few steps focused on emphasizing the geometric pattern of curve of the mouse that would be more accurate for the spaceship-like form of my computer mouse.


Although I cutting the bottom part of the paper mouse was effective in making the paper form appear more geometric, the cut felt a little awkward, especially as it was still attached to the side wings (see left image).
Instead, I recut a top plane piece and extended the angle of the cut to reach further down the mouse. This way, it would still be able to support the side wings while also having a sharper cut at the base of the curve.
FINAL PAPER MOUSE MODEL


HYBRID FORM APPROACH VIDEO
HYBRID FORM // TRANSLATING THE ESSENCE
For my hybrid form, I had a few qualities that I wanted to maintain from my natural and human-made object:
- curved/organic nature
- smooth essence from both objects
- centered/ balanced
Although these formal features were present in my forms, in order to visualize a hybrid form, I first started experimenting with sketches and exploring different ways to communicate through form.


Through these sketches, I was not only able to test out features such as the wing or spirals, but also explore different weight, symmetry, and orientations. While some of my sketches were too narrow or detracting from the qualities I was aiming for, each of them focused on a new way to incorporate the essence of that feature in my hybrid form.
As I did not want to limit myself to experimenting with hybrid forms from sketches, I started my clay model with a general direction to move towards but not necessarily a distinct object to replicate.


My foundation form for my hybrid model started with a base shape that was similar to many of my sketches that I had envisioned. Once I had the base shape down, I began focusing in on specific qualities that I wished to communicate in my hybrid form.


Due to the malleable nature of the clay, I spent a lot of time making and remaking different parts of my hybrid form to experiment with how certain curves and weight distribution made me feel. This process of modeling was heavily focused on trial and error based on emotions felt from the essence of the hybrid form.
Ultimately, my main focus in the hybrid form was finding a way to incorporate the curvy, organic flair in my shell while also maintaining a centered weight of distribution that was shown in my shell. Essentially, my form was an exploration to discover the medium between two nearly contradicting features of my objects: how can I translate the balance of my computer mouse into an irregular or organic form?


LOOKING BACKWARDS
- My hybrid form was less abstracted in shape as a whole, making it feel a bit too close to the shell form
- The essence of the mouse is overpowered by the steep curves
- While parts of the hybrid capture the essence of the flair well, the strong repetitive nature of the curves almost creates too strong of a spiral shape
MOVING FORWARDS
- Incorporate a stronger essence of my mouse form
- Reduce the overpowering nature of the curves or make the essence less prominent
- Try to consider other qualities of my shell and mouse instead of the few main physical features that I picked out
HYBRID FORM CLASS CRITIQUE

ITERATING // REFINING HYBRID FORM
After studying my words, I decided to readjust my direction with my hybrid form by choosing a new set of words that were less generic and more distinctive towards my specific conch shell and geometric mouse. Scrapping the vague terms such as “curve” and “smooth,” I started giving my own hybrid form distinctive features as well.
Similar characteristics:
- Winding
- Sloped
- Lipped
Different characteristics:
- Geometric/sharp
- Irregular/imbalanced


To start, I decided to scrap the tapered ends that made my hybrid form look more like a croissant (which has no resemblance to either of my forms) and allow the curves to end with sharper edges like my mouse. By studying the ways the curves of the mouse are cut, I used a knife in order to sculpt out a steeper angle for the tip of the hybrid form.


Much of the iterative process of creating my hybrid form came from physically experimenting with the clay. The malleable nature of the clay allowed for a lot of exploration, so being able to play around with a certain shape or cut and understanding how that made me feel was an extremely helpful point to move from one iteration to another.
FINAL HYBRID FORM PICTURES


REFLECTION
Throughout this project, I gained a much better understanding of how the unique qualities of a form provide a greater definition of its purpose and function. Physically experimenting with abstracting and sculpting the forms of the shell and the mouse was a hands-on experience that showed the subtle yet significant differences.
For example, the bumpy, rough nature of the shell and its irregular form were much more difficult to rotate and sculpt in my hands than the smooth and simple curve of the shell, showing how the steep yet balanced features of the mouse are more inviting to hold for humans. Experimenting with different forms and materials not only taught me about the what and how of the curves and proportions of the objects, but also the why.
And after studying creating the four models using different materials, creating the hybrid form was a summative experience of combining my experiences with the previous iterations and my creativity. The freedom of being able to create a form with any medium and without any strict basis forced me to learn how to narrow down what features of the shell and mouse I really wanted to emphasize, and using clay as my medium taught me to move in a direction that was more driven by the essence of the iteration instead of the aesthetics. Although studying different 3D forms was definitely a transformative experience through craft and labor, the learning process of coming up with my own hybrid form helped me reach a deeper understanding of the function of a physical form as a whole.